![[Warpspeed]](/home.gif)
![[Table of Contents]](/Products/OS2/GU/Manual/toc.gif)
![[Index]](/Products/OS2/GU/Manual/index.gif)
![[Previous]](/Products/OS2/GU/Manual/previous.gif)
![[Next]](/Products/OS2/GU/Manual/next.gif)
GCD scans the specified drive and produces a graphic tree representing the structure on the drive. You may move a highlight bar through the listed directories and use the Enter key to change to a particular directory.

Usage: GCD {Switches} <Drive Spec\Start Path>
Note : If no drive specifications are given, then the current drive is listed.
GCD scans the specified drive, or if no drive is specified, scans the current drive and produces a graphic tree representing the directory structure of that drive. If an initial path is given, GCD will search for an occurrence of the path in the directory structure. it is not necessary to give the complete directory path component. The specified component is used as a sub string to search within the full directory name, not just the last subdirectory portion of a complete directory path. Thus, if OS2 is specified, GCD will find matches in:
If no start path is given, GCD will highlight the current directory. Whether or not a start path is given, you will be presented with a window similar to the following:
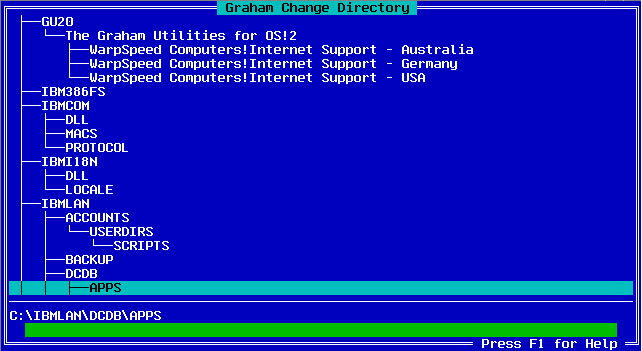
You may use the Up Arrow, Down Arrow, Page Up, Page Down, Control-Home (move to the very top) and the Control-End (move to the very end) keys to change the current directory. The current directory is shown by the highlight bar, as well as being listed at the bottom of the screen.
There is also an edit field at the bottom of the screen. This field is used to enter a partial directory match for a speed search. Every time a key is pressed a partial search is done. Control-Enter can be used to find the next matching entry. Remember, GCD reports a match on any point within the full directory name.
To change to the currently highlighted directory press the Enter key. The program will exit and change to the specified directory. The ESC key will cause the program to exit without changing directories.
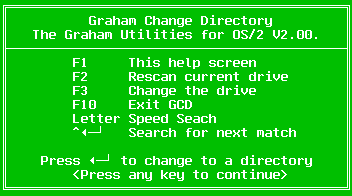
Help is available via the F1 key. If pressed you will be presented with this screen:
GCD saves the directory structures of disks which it scans (unless the -n switch was specified) in the GCD.INI file. Each time you select a disk, GCD reads the volume label and uses that information to look up previously saved directory structures. This saves time when loading GCD. However if you have created or removed directories since the last time you ran GCD, the saved data will be incorrect. It is possible to use the F2 key to force a rescan of the drive. GCD will save the newly read data (unless the -n switch was specified), so the next time you run GCD it will have the correct data. Saving data can save a considerable amount of time, particularly if the directory structure on the drive is complex.
If you wish GCD to change drives, press the F3 key and you will be presented with the select drive dialog box, which will look similar to the following:

Use the left or right arrow keys to select the required drive. Press Enter to choose that drive. Alternatively, you can simply press the desired drive letter. Pressing ESC will cause the program to abort and no drive change will occur.
The select drive dialog box can be bypassed by entering a drive specification when GCD is started.
By default, GCD uses the GU environment variable to locate the GCD.INI file. Alternatively, you may use this switch to specify an alternative path to locate the GCD.INI file. If GCD.INI is not found, GCD will rescan the directories on the disk. The GU environment variable is set in your CONFIG.SYS file as set by the install program.
By default GCD will save the scanned directories in the GCD.INI file which is pointed to by the GU environment variable. This switch stops GCD from saving the data.
A rescan can be forced by specifying this switch. It will scan the drive and save the data - unless the -n switch was specified.
GCDGCD will display the directory structure, as previously saved, on the current drive. If no data has been previously saved, GCD will scan the disk and save the data.
GCD -rGCD will rescan the current drive, save the structure information, and display the directory tree.
GCD -rnGCD will display the directory structure on the current drive after rescanning the disk. The data will not be saved.
GCD E:GCD will display the directory structure on drive E:
GCD E: -rAfter having rescanned drive E:, GCD will display the directory structure of drive E:.
GCD E:\OS2UTILSGCD will display the directory structure on drive E:. The current directory will be set to the first match of "OS2UTILS" (if one exists).
GCD \OS2UTILSGCD will search for the \OS2UTILS directory on the current drive. If it is not found, the highlight bar will be on the current directory.
GCD -iC:\GU20GCD will use the file C:\GU20\GCD.INI to save its structure information.