![[Warpspeed]](/home.gif)
![[Table of Contents]](/Products/OS2/GU/Manual/toc.gif)
![[Index]](/Products/OS2/GU/Manual/index.gif)
![[Previous]](/Products/OS2/GU/Manual/previous.gif)
![[Next]](/Products/OS2/GU/Manual/next.gif)
DiskEdit allows you to edit disks.

Usage: DiskEdit {Switches} <Drive Spec>
Warning : Use of this option is NOT recommended.
DiskEdit is a program which allows you to edit both floppy and hard disks. It enables you to edit hard disks in either logical or physical disk modes. The physical disk mode allows you to edit a hard disk on an absolute sector basis. You will need to use this mode if you wish to edit your partition table. The logical disk mode only allows you to edit sectors within a logical disk.
The default editing mode allows you to edit sectors in hexadecimal or ASCII. This is known as RAW mode. DiskEdit will display a complete sectors' worth of data at a time for you to edit. It will change the screen mode to 35 rows to accommodate the amount of data which needs to be displayed. If the screen mode can not be changed, DiskEdit will default to 25 rows. However it can not display a complete sectors' worth of data, and you will have to scroll the screen to see all of the data.
If you enter DiskEdit with no parameters it will default to editing the current disk in logical mode. If you wish to edit the total disk, which may span multiple logical partitions, use the -p switch to force DiskEdit to edit in physical disk mode.
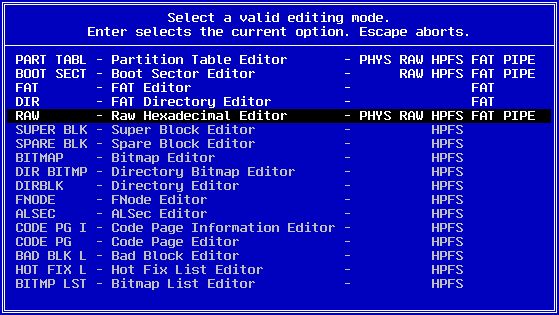
DiskEdit uses a DLL to do most of the work when editing a disk. DiskEdit itself manages the higher level functions as well as which particular DLL is called. DiskEdit searches for a DLL with a name of the form DEFSName.DLL - where FSName is the name of the file system (FAT, HPFS and so on). If DiskEdit can not find the appropriate DLL (DEFAT.DLL, DEHPFS.DLL and so on), DERAW.DLL will be loaded. You may also force DiskEdit to load DERAW.DLL by using the -r switch. The DLL contains the lower level functions, such as the reading and writing of the disk as well as the editing functions. The first thing which DiskEdit does is to load the appropriate DLL and display its version information. It will be one of the four DE*.DLL's supplied.
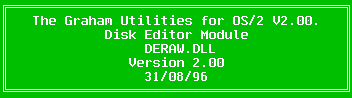
This is the initialisation dialog box for DERAW.DLL. It is used for logical disk editing.
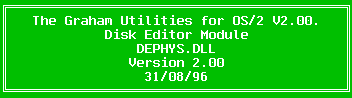
This is the initialisation dialog box for DEPHYS.DLL. It is used for physical disk editing.
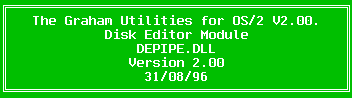
This is the initialisation dialog box for DEPIPE.DLL. It is used for remote disk editing.
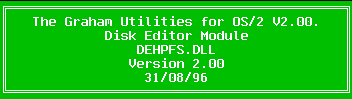
This is the initialisation dialog box for DEHPFS.DLL. It is used for editing HPFS partitions in their native formats.
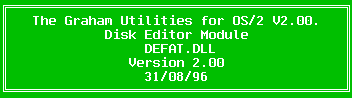
This is the initialisation dialog box for DEFAT.DLL. It is used for editing FAT disks in their native formats.
Please consult Appendix I - DiskEdit Modules, for further information on all of the DE*.DLL's and the editing modes which they provide.
After doing this, DiskEdit attempts to lock the disk for exclusive access. This is so that no other processes can access the disk while you are editing it. It has been done to protect your data. DiskEdit has the ability to change data which may be in use by other applications. These other applications will not be notified that the data has changed, and thus data corruption is likely. If DiskEdit can not obtain exclusive access to a disk, you will be prompted with an error dialog box similar to the following:

for logical disk modes, and:

for physical disk modes.
If you only have one disk (either physical or logical) you will see one of these error messages. This is because OS/2 itself is using the disk. If you wish to edit the disk safely, you should reboot OS/2 off a floppy and then use DiskEdit.
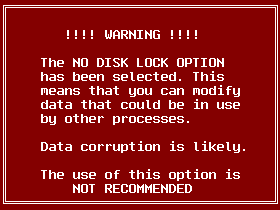
If you wish to simply view the data on a disk and not edit it, you may use the "-nolock" switch. This switch allows you full read access to the disk, but it disables all editing and writing functions. If you attempt any of these functions you will hear a low tone warning you of an illegal function.
If you have the absolute need to edit an unlocked disk, you may enter the "-nolock" switch followed by the "-allowwrites" switch. They must be specified in that order. As a reminder you will be given an audible alarm and be presented with the following dialog box:
Press any key to continue.
The next thing that DiskEdit does is to validate the disk parameter values. If there are any discrepancies between the actual and reported values, DiskEdit will warn you with the following dialog box:
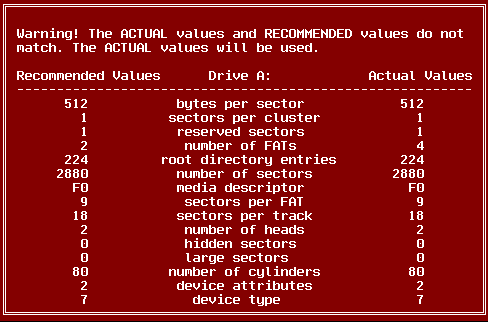
You should not continue beyond this point. You should take actions to correct the problem. It probably means that you should back your data up and reformat the disk. In the above example, the number of FATs is incorrect. The disk reports that it has 4 FATs, but OS/2 recommends that it should only have two.
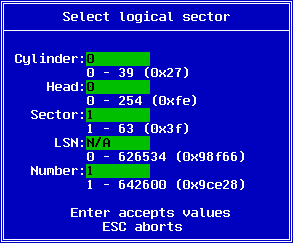
If disk has passed all of these checks, DiskEdit will now prompt you with the sector selection dialog box similar to one of these:
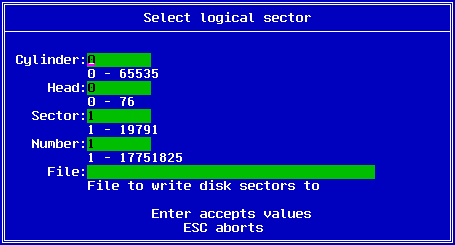
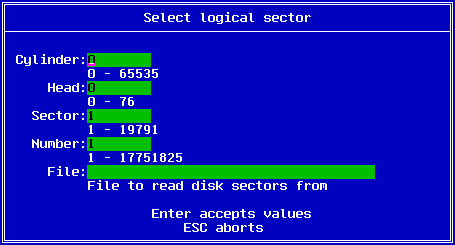
This is the sector selection dialog box for the DERAW, DEHPFS and DEPIPE DLL's.
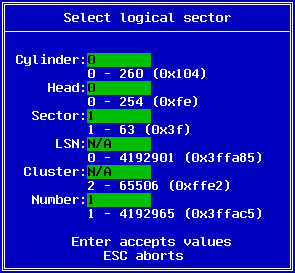
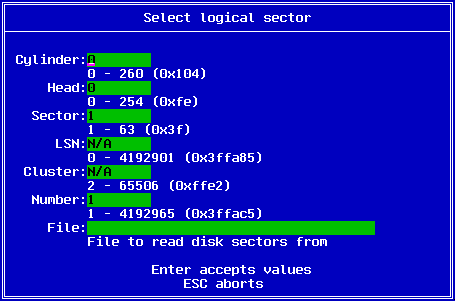
This is the sector selection dialog box for the DEFAT DLL.

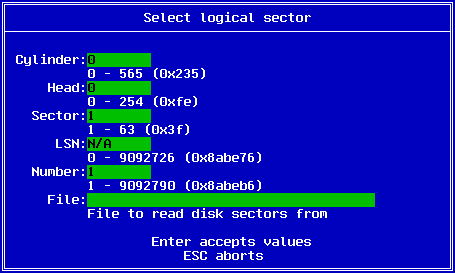
This is the sector selection dialog box for the DEPHYS DLL.
It is here that you enter the Cylinder, Head and Sector at which you wish to start editing. The Number field is used to specify the number of sectors from the point at which you wish to conduct search, file read and file write operations.
Use the Up, Down and Tab keys to move between fields. The Enter key accepts the entered values. The Escape key will exit the entry of values and DiskEdit will exit.
If you pressed the Enter key, DiskEdit will read the sector and display it to you. It may look similar to this:
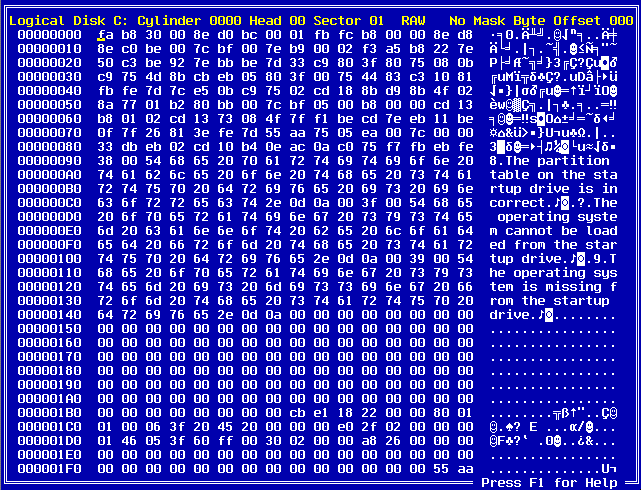
The top status line displays the current editing options and data. It lists whether you are in Logical (Raw, FAT, HPFS or Pipe) or Physical disk mode. The current cylinder, head and sector are displayed in hexadecimal. The current editing display mode is listed along with the current mask state. The byte offset within the current sector may also be displayed.
At this point you are in basic editing mode.
The TAB key switches between hex and ASCII editing modes. When you are editing in hexadecimal, you can only enter hex values ('0'-'9','A'-'F'). In ASCII editing mode you may use all ASCII keys. The cursor control keys are active in both modes. The Page-Up and Page-Down keys move you one sector up or down respectively.
The bytes that have been changed are displayed in yellow. You are always prompted before any data is written back to the disk. You have the option of discarding the data, saving the data or continuing to edit the data.
When you have finished editing the data, and you wish to write the data to disk, simply press the Enter key. You will be presented with the following dialog box:
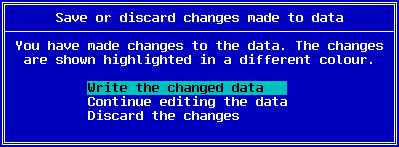
You may use the Tab, Up or Down Arrow keys to move between the selections, or simply press the highlighted letter to select that option. The Enter key selects the currently selected item.
You will also be prompted with the same dialog box if you attempt to move onto another sector and you have not saved any changes.
Use this option to view disks which are locked. This option also turns disk writes off, so that you can not accidentally modify data on a "live" disk. If you really need to modify data on a disk which you can not lock, use the -allowwrites option.
As the -nolock options turns disk writes off, this options turns them back on. This option MUST be specified after the -nolock switch.
Warning : Use of this option is NOT recommended. You could modify data which belongs to a file that is otherwise locked. Modifying data which is in use by another process without that process's knowledge may have disastrous effects.
This switch enables you to specify an initial starting cluster. With the switch, the initial sector selection dialog box is bypassed. This is only available when editing FAT disks using the DEFAT.DLL module.
The default editing mode is RAW hexadecimal. This switch allows you to specify the context sensitive editing mode (if available). This is the equivalent to pressing F6 when the disk editor is first started.
This switch enables you to specify an initial Logical Sector Number. With this switch, the initial sector selection dialog box is bypassed. This is only meaningful with the DERAW, DEHPFS and DEPIPE modules.
The default mode is Logical disk editing mode. This switch changes the operation of DiskEdit so that is accesses complete physical disks, not just logical disks.
Note : If you only have one primary partition on your disk, the use of this switch is unnecessary.
If DiskEdit is to edit a HPFS partition, the DEHPFS.DLL will be loaded to edit it. There may be circumstances where you wish to use the DERAW.DLL instead. This switch forces DERAW.DLL to be loaded.
HPFS386 is a version of HPFS that comes with IBM LAN Server. It is optimised for larger disks as used with file servers in LAN environments. With LAN Server Version 4, IBM has introduced checksums of the Super and Spare block for additional data integrity. When the HPFS386 partitions are mounted, the saved checksum values are compared to the calculated ones. If they do not match then a CHKDSK /F is done - even if the volumes were shut down cleanly. This switch tells DiskEdit to recalculate the appropriate checksums as necessary and save them after your changes have been made.
This switch forces DEPIPE to be loaded and allows DiskEdit to access disk drives located on remote machines. The Machine Name must be specified with a leading "\\". The machine name of the remote machine will have been specified when the network software on the remote machine was installed.
Note : DESVR must be running on the remote machine for this option to work.
Consult Appendix H - DESVR for further details.
When you are editing, some of the function keys have the following functions assigned to them.
The F1 key brings up the help dialog box. It looks like this:
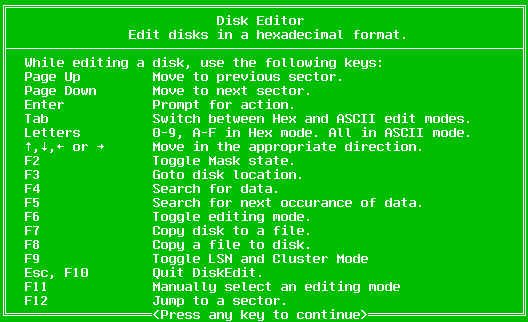
Press any key and you will be returned to edit mode.
The F2 key toggles the mask state. When masking is on, only normal ASCII characters are displayed. The default is masking off. With masking off, all characters with the exception of the character zero are displayed.
Use the F3 key to go to a specific location on the disk. The sector selection dialog box will be displayed.
The F4 key is used to search for data. You may enter data in ASCII text form, or in hexadecimal. The Tab key switches between entering data in ASCII and hexadecimal.
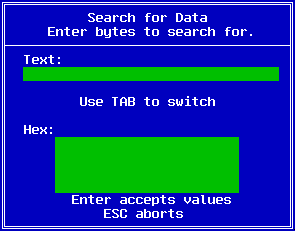
Pressing Enter will start the search. The Escape key aborts the entry and returns you to the basic editing mode of DiskEdit. DiskEdit will search from the chosen starting point for the number of sectors specified. The search performed is case insensitive. When DiskEdit is searching for your data you will see the following dialog box:
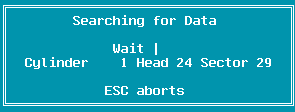
The cylinder, head and sectors are displayed as they are read. You may press the Escape key at any point to abort the search.

This dialog box will be shown if you pressed the Escape key.
You will see one of the following two dialog boxes if the search is allowed to continue to the end of the specified area.

You will see this dialog box if a match was not found. In this case, you will remain at the point from where you started the search.

This dialog box will appear if a match was found. The cursor will be moved to the area where the match was found, and the new sector will be displayed.
The F5 key continues the search for the next occurrence of the data. If no search data has been entered, DiskEdit will prompt you to enter the data (as if you had pressed the F4 key).
The F6 key toggles the current editing mode. The default editing mode is RAW. Ie. raw hexadecimal format. Depending on which portion of the disk you are editing, the F6 key toggles between RAW mode and a mode appropriate for that area.
For example, the F6 key toggles between RAW and Partition Table modes when you are editing the first sector of a physical disk.
The current editing mode can be manually selected using the F11 key.
Note : Please consult Appendix I - DiskEdit Modules for a further description of the available edit modes.
The F7 key allows you to copy sectors to a file. You are prompted with a dialog box similar to one of the following three. This is for the FAT disk editing module:
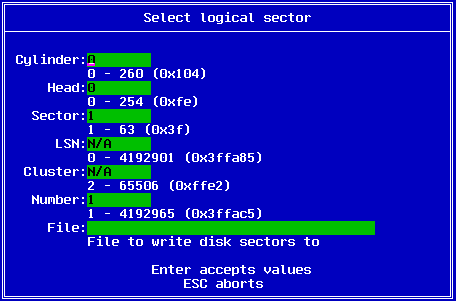
This is for the RAW, HPFS and PIPE disk editing modules:
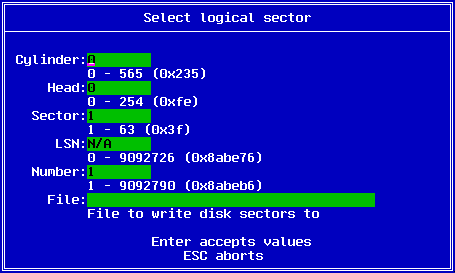
This is for the DEPHYS editing module:
You enter the starting cylinder, head and sector, the number of sectors as well as the file name which the data will be saved to. Once the data has been saved as a file, you may edit it by other means. The F8 key may be used to save the file back to the disk.
If no file name is entered, you will see this dialog box:

From there, you will be returned to the main editing window.
Note : The file specification of the file refers to the local machine, not the remote machine, when using the remote disk editing option.
If you have multiple partitions and enough free disk space, you could perform an image backup of a complete disk by saving the entire disk to a file. That file could then be backed up to tape (or by other means). An image backup is a complete sector by sector save of the disk data. When you do an image restore, each sector is replaced to whence it originally came. Normal backups only save the file data, no information about the position of the files on the disk is saved. DiskEdit was not designed to do complete disk images, it was designed to do small amounts of disk information in this manner. DiskImg was written specifically to address the problems of imaging both logical and physical disks.
As the save continues, you will see a bar graph indicating the progress of the save.

The F8 key enables you to copy the data in a file directly to the disk. It is the complementary function to the F7 key. You will be prompted with a dialog box similar to one of the following three.
This is for the FAT disk editing module:
This is for the RAW, HPFS and PIPE editing modules:
This is for the PHYS disk editing module:
You enter the starting cylinder, head and sector, the number of sectors as well as the file name which the data will be read from.
If no file name is entered, you will see this dialog box:
From there, you will be returned to the main editing window.
Note : The file specification of the file refers to the local machine, not the remote machine, when using the remote disk editing option.
Saving data directly to a position on the disk is a very dangerous operation. If you save data to the wrong portion of the disk the disk may become corrupted and totally unusable.
As a reminder of this, you are prompted with the following warning dialog box:
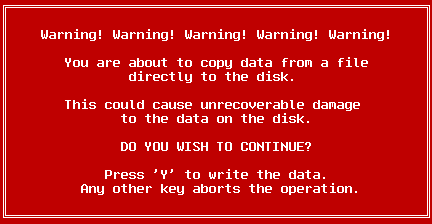
If you are certain that you wish to continue, press the Y key. Any other key aborts the operation, and the data will not be written to disk.
The F10 and Escape keys exit the DiskEdit program. You will be prompted to save any unsaved data if needed.
The F11 key enables you to manually select an editing mode. You only need to use this if the F6 key (Toggle editing mode) does not correctly identify the correct sector type. You will be prompted to save any unsaved data if needed.
When editing a sector in a context sensitive mode, some of the fields are Logical Sector Numbers or Cluster Numbers. The F12 key allows you to jump directly to the sector specified. This enables you to easily navigate around the disk. If needed you will be prompted to save any unsaved data.
DISKEDIT A:DiskEdit will edit drive A:. All other processes will be stopped from accessing drive A: whilst DiskEdit is using it.
DISKEDIT -p1Edit the first physical hard disk. You will need this option to edit the partition table. To edit the drive safely, you will need to boot from a floppy, unless you have installed OS/2 on a second physical hard disk.
DISKEDIT C: -nolockIf any other processes, such as OS/2, are using drive C:, DiskEdit will not be able to lock it for exclusive access. Use the "-nolock" option to view the disk data. In this mode all editing functions are disabled. You are not allowed to change data, you are only allowed to view it.
DISKEDIT C: -on \\MAINDiskEdit will attempt to access C: on the remote machine named MAIN. All other disk editing features act as normal.